Intro

Intro

Tuesday 14 December 2021

BLACK SEAS - HOW TO LOSE YOUR NO CLAIMS BONUS!

 After a week or so painting, rigging and fitting sails, I have a grand total of TWO of Warlord Games' beautiful little sailing ships ready to play Black Seas. I decided to start small and paint brigs, one each for the Royal Navy and the French Navy. With two brigs completed, it's time to get them on the table and try out the first scenario in the rule book.
My Royal Navy brig is HMS Reliable, commanded by Lieutenant, The Honourable, Archie Browne-Trowsers, younger son of the Earl of Fordwich.
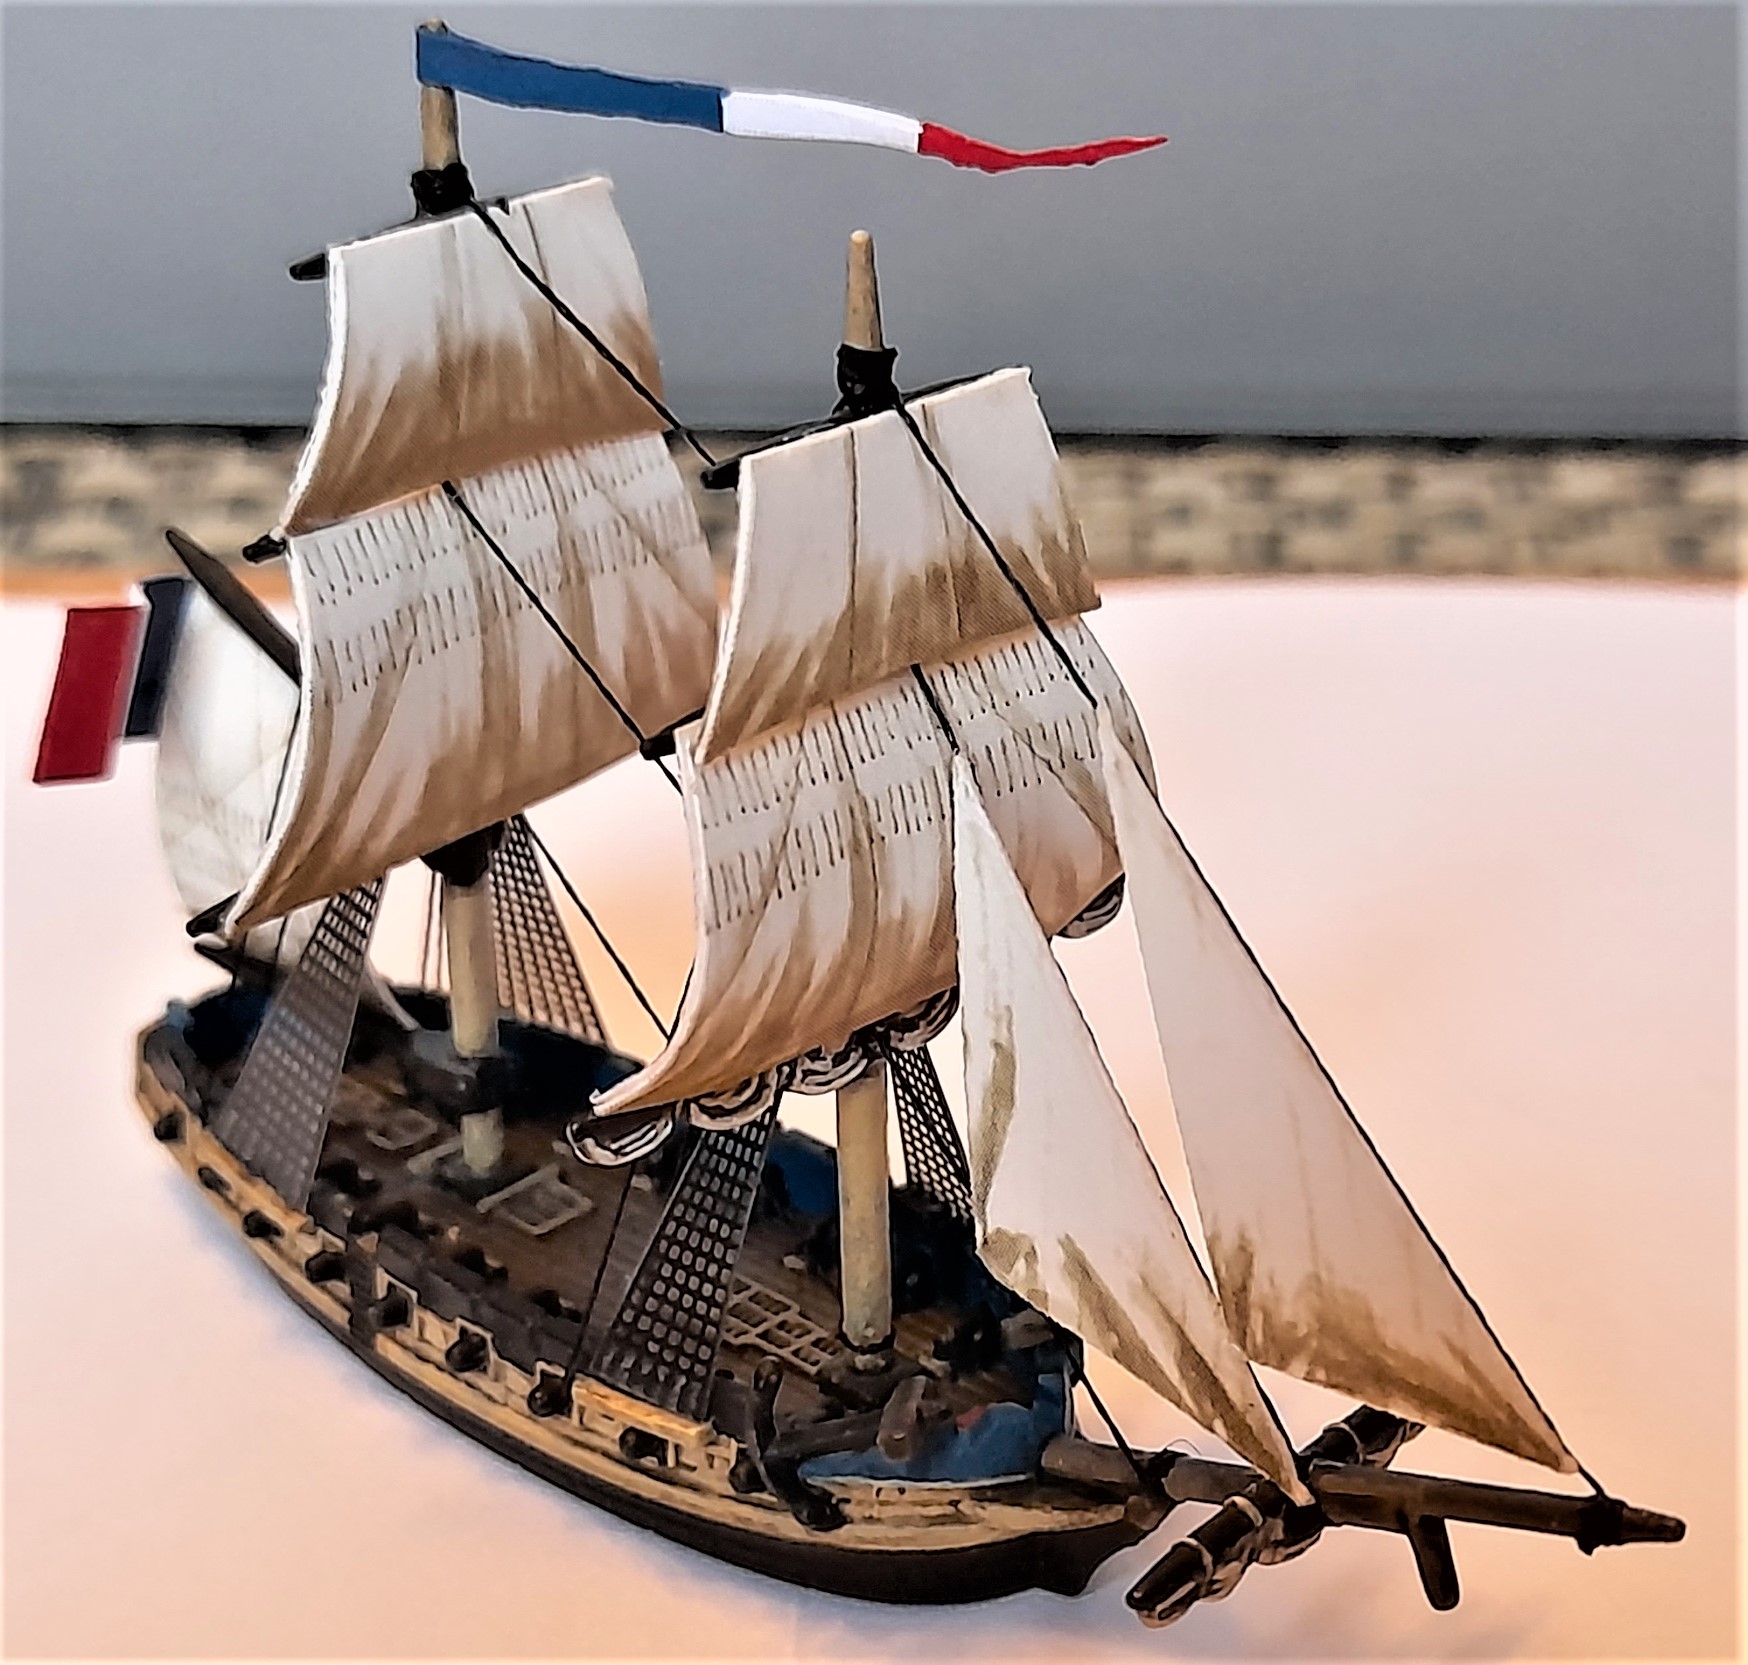
Sworn enemy of Browne-Trowsers is Lieutenant Maurice Mangetout, Master and Commander of the Honnete.

As mentioned above, my very first venture into the Black Seas, was to be the opening scenario in the rule book, Out of the Fog.

The table was set up with the wind blowing a gentle westerly and the random die roll gave the Honnete the weather gauge, sailing from the southern edge of the board.
The first lesson you learn about Black Seas, is that, although the ships seem to be miles away from each other at the start of the game, the distance between them closes so rapidly that, by Turn 2, they are suddenly passing each other at point blank range.

I need to read the rules about "fire as she bears" before my next outing, as Mangetout missed the opportunity to inflict some damage on Reliable as they passed. First shots in the encounter were fired by the Reliable however and Honnete suffered a couple of points of damage.

In the videos I've watched of Black Seas games, the wind never seems to change direction, but on Turn 3, the wind shifted a point, moving round to a south-westerly. This was massively significant, as it gave the weather gauge to the Reliable and she was able to start a manoeuvre round to port to chase down the Honnete, which has begun to make a dash for the table edge and an honourable, if somewhat boring, draw.

On the next turn, Reliable caused more damage to the Honnete and attempted to grapple the French brig. Fortunately for Mangetout, the Royal Navy failed their Skill Test and the grapple failed. However, the Reliable used the rest of its activation to swing round in front of the Honnete, forcing the Frenchman to take a collision test at the start of its next activation!

Yet more failed Skill Tests led to the Honnete smashing uncontrollably into the Reliable and the 8 points of damage, on top of the earlier firing damage inflicted by the British gunners, triggered another French Skill Test... inevitably, the Dice Gods looking unfavourably down on the Honnete, another failure resulted in the Frenchmen Striking the Colours and surrendering to a delighted Browne-Trowsers.

So, the young Lieutenant Archie has taken his first Prize and the First Republic had lost its first ship to the Royal Navy. Surprisingly, I didn't roll any Critical Hits in the game, which was a bit annoying as I'd spent a large part of the previous day making a "Critical Hit Table", to print onto the reverse of the QR Sheet. All in all, I'm looking forward to the next game, even though I found some bits a bit fiddly. I used paper clips to keep track of damage, rather than the tiny card markers in the set and, I found making turns a tad knotty as the ships slid about quite a bit on the shiny surface of the mat.
The festive season is going to need some time committed to more ship building and some further reading into the Additional Rules section of the rule book. For now however, we need to say Adieu to Maurice Mangetout and the crew of the Honnete, as they sail into the frightful captivity of a prison hulk!

Friday 3 December 2021

Blood Bath on the Char Beck... A Knyghte, Pyke & Sworde Skirmish.

 Following their repulse at Elwick Bridge, Hugh de Puiset and his band of Frenchmen, withdrew and found an alternative route to Durham on the north bank of the Char Beck. Despite the wound he received in the earlier encounter, Hugo Flambard hurried his small band of supporters to attempt to block the French for a second time and, hopefully, drive them back to their ships moored in the port of Hartlepool.

Flambard's deployment was a hurried affair, with his spearmen arriving on the battlefield just in the nick of time...
Upon sighting the Flambard forces, the French deployed into a ragged line, crossbowmen on the left, spearmen in the centre and de Puiset, with his Men-at Arms on the right. Flambard's archers arrived on the left of their line, with the two units of spearmen hurriedly advancing in a column on the right.
First card drawn out of the deck was the French spearmen and they move up to join the line.

As Turn 1 continued, Hugh de Morville races ahead and de Puiset leads his Men-at-Arms towards the enemy. The French crossbowmen realise that they have no room to influence the battle and begin to move across to the right flank, where they can face the Flambard archers.
Meanwhile, the Flambard spearmen advance to find room to deploy into a battle line before the Frenchmen can engage while they are still in their marching column.

de Puiset and de Morville dash ahead to catch the Flambard spearmen at a disadvantage.

At this point in the battle, disaster struck for the French invaders... forced to take a Bravery Test after drawing the Bol de Porry card, the crossbowmen panic and unexplainably rout from the battlefield heading off back towards their ships! 

Unaware of events unfolding behind him, Hugh de Morville, the slayer of Thomas Beckett, hurled himself into the fray, and engaged in a deadly duel with the leader of one of the Flambard spear units.

With the narrowest of modified die rolls, de Morville inflicted a nasty wound upon his adversary and forced him back into the midst of his men.

In the centre of the line, the French Men-at-Arms charged into the second of the Flambard spear units and a mortal combat ensued.

Under pressure all along the line, the Flambard spearmen began to take casualties and were forced back by the relentless pressure of the French onslaught.

At this critical point in the battle, de Puiset was wounded by a Flambard arrow and, with the Flambard archers working their way around behind the French line, it looked as though Sir Hugo might just snatch victory from the jaws of defeat. However, the archers next volley proved ineffectual and little now stood between the French Men-at-Arms and the road to Durham.

With his faithful lieutenant, Jerrard Sibton, wounded in the clash with the Men-at-Arms and his spearmen crumbling all around him, Hugo Flambard began to realise that his attempt to block the French advance on Durham looked doomed to failure.

Over on their right flank, things looked no better for the Flambards; de Morville had continued to drive on the French spearmen and, under the relentless pressure, the Flambard spearmen, with only two unwounded men remaining, began to fall back across the field.

After an epic and bloody struggle, the Flambard line collapsed and the few remaining survivors fell back, leaving the field of battle to the victorious Frenchmen. In all, the Flambard's had lost over half their number and, of those remaining, only Hugo and two of his spearmen remained unwounded. Fortunately, the archers had managed to extricate themselves, having expended all their ammunition, to fight another day.


The gallant French Men-at-Arms had finally had the opportunity to display their martial prowess; an opportunity denied them in the confined space at the battle of Elwick Bridge.

Finally, the run of Flambard victories had come to an end and de Puiset was able to join forces with his uncle, the Bishop of Durham. Sir Hugo would need to recruit new forces and plan a new strategy to defeat the combined forces of the de Puiset dynasty.

Sunday 28 November 2021

TINKERING WITH RULE SETS... SHOULD YOU DO IT?

Earlier this year, I bought and downloaded a PDF copy of the Knyghte, Pyke and Sworde rule set from Nordic Weasel Games. The rules are a massed Dark Age and Early Medieval skirmish set, which are aimed at games with as few as half a dozen figures, or up to around thirty odd, per side.

The rule set seemed ideal for small games set in the 12th Century, which gave me the opportunity to paint up some Fireforge Medieval figures I had collecting dust at the back of a cupboard in the garage. I'd been reading about the Great Rebellion of 1173, where Henry II found himself beset by a revolt led by his wife and children, who were supported by the kings of both France and Scotland! With Henry away attempting to put down rebels in Normandy, I developed a "campaign" of sorts involving an avaricious bishop and a "Robin Hood" sort of character intent on upholding the law of the beleaguered monarch.

After a couple of small scale trial games, I was coming to the conclusion that, although I really enjoyed the rules, there were aspects which I really felt the need to tinker with, to make them fit the specific needs of my 12th century scenario.

Most obvious, was the activation system, which, in the original rules, follows an alternating turn sequence. Because I was playing solo games, something more random and out of my control was necessary. To achieve this, I decided to introduce a card activation system and made a card set with cards displaying the different troop types deployed on the table top. When a particular troop type card was drawn, a unit of that type could be activated, but any unit could only be activated once per turn. Each side had cards of a different colour, which introduced a little tension as each card was drawn from the deck.
To add a little extra mystery, I also included two other cards; a "temps passe" card, which ends the turn and a "bol de porry" card which can result in an individual or a group possibly missing a turn or having to take a Bravery Test. Drawing either of these cards can put a real spanner in the works and drive a cart and bullock right through your best laid plans!

A pretty major deviation from the original rules in my games, are the classifications of the troops which appear on the battlefield. When I thought about the types of troops I needed to fight my 12th century skirmishes, I arrived at a list of 7 different classes:

1. Armed Peasants (these replaced Rabble)
2. Fyrd (these are the equivalent of Levy)
3. Spearmen (these replaced Shields)
4. Archers (these replaced Missiles)
5. Crossbowmen (these are a variation of Missiles)
6. Men-at-Arms (these are a variation of Chargers)
7. Hero (all individual figures are Heroes and one of them is designated the warband leader)

All of these classes are pretty much the same as their original KPS counterparts, but I have made slight alterations to their characteristics to fit in with the most radical tinker that I made.

One of the problems I found with KPS was that the combat system was based too heavily on the random die roll. I had two occasions where "Rabble" unrealistically out performed characters or groups of higher ability and so I switched the emphasis away from that initial die roll. In its place I created a "Dice Roll Modifier Table", on which, the randomiser was based upon the fighting skill of the figure in the melee.

My adapted combat system now starts with "Combat Skill", adds the modifier from the table and any "Situational Modifiers" which apply.
The die roll modifier gives a more balanced outcome to combats, without making it impossible for the lowliest peasant to get the better of a well armed and armoured Man-at-Arms... especially if the peasant teams up with a buddy and they are defending an obstacle! However, the longer the melee goes on, the more likely it is that the feudal superior will get the upper hand.

The final tweak to the KPS system was one of simple semantics; it seemed to me that the term "Exhausted" was just a tad extreme for the circumstances in the game where it applies. Although I would be exhausted after running 5 inches, I thought the lean and athletic characters fighting for King and Country in KPS might get "fatigued" after a bit of a run, but not "exhausted". I really like the way "Fatigue" is used in Clash of Spears, so it should be feasible to create something similar in KPS, which would add more flexibility to the way "fatigue" impacts on the actions figures make in the game.

Having said all this, it may appear that KPS is a system which doesn't work, and that is far from being the case. KPS works brilliantly and gives a really fun and exciting skirmish game. Because I was attempting to create a specific campaign based around specific historic events, it seemed to me a legitimate excuse to adjust the mechanics of the game slightly to create a greater period feel. The use of "Fyrd" for example, rather than "Levy", is, in my opinion, legitimate because "Fyrd" was still a term used at the time, until it fell into disuse after Henry II's Assize of Arms in 1181. The adoption of the Die Roll table gives a less random outcome to combat, particularly between the extremes of the feudal array.


I have plenty more battles to come using these Tinkered KPS rules, where hopefully, the Armed Peasants of Palatine County Durham will still be able to perform their acts of derring-do and the knights and men-at-arms will also be able to show off their particular set of combat skills.

Friday 19 November 2021

A Very Uneven Clash of Spears!

 Heiro the Syracusan Encounters a Roman Patrol Occupying the Sacred Temple Ruins of the Paliaci.

The Ruined Temple of the Paliaci on the Palagonian Plain. (Along with some Clash paraphernalia!)

In my latest learning game of Clash of Spears, just over 500 points of Republican Romans faced up to 550 points of Syracusans lead by Heiro the Hero of Syracuse.

The Roman patrol, led by Titus Arellius, which had stumbled across the ruined temple of the Paliaci in the Palagonian Plain, consisted of 6 Velites, shielded skirmish specialists, 8 Hastati and 6 Principes.

Having been alerted by local shepherds of the Roman presence, Heiro set out with a force consisting of 6 Psiloi, 6 Archers, 8 Peltasts, and two groups of Hoplites, 6 unarmoured Citizen Hoplites and 6 Veterans clad in the full Hoplite panoply. 

Titus and his outnumbered forces watch as the Syracusans advance inexorably towards them.
Although Heiro had the advantage of numbers, in his haste to eject the detested Romans from the temple ruins, he neglected to add any other commanders to his warband and, consequently, was always going to have difficulty activating all of his units while Titus, on the other hand, would have sufficient Action Points to go around.
Heiro sends his Psiloi scurrying off to engage the Roman Velites occupying the Temple Ruins.

The brave Psiloi, shieldless and exposed dash, to evict the invader from the sacred ground.
 
The Psiloi advance and stop short of the Romans before making a Throw move, causing two casualties, in spite of the cover provided by the ruins.

The Velites gain two fatigue points from the attack and stall, making them unable to react to the Psiloi.

With the Romans stalled, the Psiloi take the opportunity to use their third action to launch another throw attack. Even the +1 Save from missiles can't prevent another Velite becoming a casualty and their Fatigue is beginning to become a serious problem.

At the end of Turn 1, the Roman Principes and Hastati are advancing, using their Drilled Trait to get a full 4 inch move while being in Close Order. The Syracusan Peltasts are advancing on the right flank with the Archers in support, while the Hoplites advance to support the Psiloi at the Temple Ruins. However, Heiro's lack of Command Points has caused the Citizen Hoplites to get left behind and Heiro is now beyond Command Range of the Psiloi!

During Turn 2, Heiro advances to stay in Command Range and the Syracusan Archers bring down two of the Roman Hastati. The Peltasts use their Skirmish Specialist Trait to fall back before the advancing Hastati.

In turn 3, the Roman Principes charge into the Syracusan Veteran Hoplites; the Hoplites Wall of Spears Trait gives them the opportunity to strike first with half of their men.
The combat is inconclusive and the Romans fall back.


The Romans try a second attack while they are still fresh.

The Hoplites get the upper hand, causing three casualties and the Roman's Fatigue rockets out of control!
Catastrophe for the Romans as their Fatigue rises to 7 and the final two Principes bite the dust!
With his elite troops wiped out, Titus decides the time has come to leave the battlefield to the enemy.

In total, the Romans lost 11 casualties compared to the Syracusan's single Psiloi lost in the fire fight at the Temple.

The obvious conclusion to this game of Clash, is that I need to paint up some more Romans! I currently have half a dozen Cretan Archers on the paint bench, so they should be joining Titus Arellius fairly soon. As far as I can tell, I pretty much applied everything rules wise that I should have done; I might have missed a Reaction Test during the scuffle for the Temple and I need to look up what happens when two units are fighting over a piece of terrain, but apart from that, I think I've managed to get my head round some the intricacies of Clash of Spears!

Tuesday 16 November 2021

Roman Hastati Square up to Syracusan Hoplites!

 It's been a while since I set up a Clash of Spears game and before my next attempt, I thought I would take a couple of enemy units and run through a melee combat between them to get the Clash of Spears combat system clearer in my head. If you've seen my last couple of battle reports, you will know that I am still very much at the novice end of Clash of Spears gaming and there is a lot to remember (especially at my age) as you go through a melee.

Units in Clash of Spears often have a number of traits which can impact upon the outcome of a melee, which means that learning how the combat system works is only the first level of mastering the game, you then have get your troops into the right configuration at the right time to obtain the optimum advantage from their specialist skills.

In the situation above, the Roman Hastati are in loose formation so that they can unleash their pila into the hoplites. Unfortunately for the Romans, the hail of missiles caused no damage whatsoever, so the hoplites have the opportunity to react and charge into the Hastati.  However, the hoplites are also in loose formation, so if they do charge, they will lose their Offensive Spear trait, which negates an advantage they would have had if the Hastati had chosen Counter-Attack as their combat response. So, do the hoplites use their reaction, assuming they pass their Reaction Test, to Attack or form Close Order and see what the Hastati do next?

As this was just a bit of a drill to get the Melee system into my head, I tried both options. Sadly, I can't draw much of a conclusion from what happened, because the dice rolled very much in the hoplite's favour when they attacked in loose order and they quickly scattered the Romans but, when I got them organised into close order, they slowly and steadily pushed the Hastati back and eventually routed them off the field. The latter felt more realistic and their list of traits certainly seem to favour their deployment in close order.


The more you play Clash of Spears, the more you realise just how many layers there are, particularly in the close combat mechanics. It's never just as case of charging one unit into another, there are always multiple factors that need to be taken into consideration and rarely do you get the opportunity to create a perfect situation for your troops. The opportunity to react to your opponent's moves is one of the things I really like about Clash of Spears but, even that can very easily go pear shaped, as I discovered in this little encounter; you can come up with a really brilliant response to your opponent's schemes only to fail to pass the Reaction Test and find yourself with one Command Point less to play with and your troops sitting there having to take whatever your opponent throws at them.

Next time I set up the games table, I'm pitting 500 points of Romans against a slightly larger Syracusan force and it will be interesting to see how much of today's learning I remember in the heat and confusion of an actual encounter... I've not achieved very much with shooting in previous games and my handling of psiloi and peltasts hasn't been particularly brilliant either but, in Clash of Spears, the real challenge is trying to remember all those little things, like stalling after taking two fatigue points in melee, adding the fatigue points when you are supposed to and applying all those traits at the right time, that add up to have a big impact on the outcome of a game.


Monday 15 November 2021

Black Seas Brigs


This is the French brig Honnête, my first attempt at a Warlord Black Seas warship! I've always had a fascination with people who have a fascination with the sea, but have never had any sort of hankering for a naval life myself. The last time I set foot on a boat was about twenty years ago, when we were stupid enough to actually pay someone to take three generations of our family on a tour of the Farne Islands, on a day when there was 'a bit of a swell'!


I made the mistake of watching some 'how to play' videos and suddenly, the Postman was knocking on the door with a Master & Commander Starter Set. Why I did it, I just don't know! The idea of painting a 1/700th scale brig model, rigging, fitting sails and ratlines must have been born of sheer madness. But, there were lots of pictures of other people's models, so it must be possible!


 There is lots of information out there, but it does take some considerable investment in time and effort to pull it all together. There are some really good tutorials on rigging frigates but the only one I could find on a brig was one where the tutor was using the guide to rigging a frigate in the Black Seas Rule Book.

If you are thinking about having a go with Black Seas, then my best piece of advice is to think in terms of how things appear to have been done historically; make yourself Master & Commander of the ship you are painting and you choose how it's all going to be done.

There is a really good method of rigging your ship with a single length of thread on the Black Seas Facebook page; I adapted that slightly and then went to Stage 3 of the rigging instructions in the Rule Book (the bit about rigging 'backstays') and that was enough for me. It is very very fiddly, but if you keep it simple and work to your own limitations, then it is massively rewarding when you get to the end.


I would definitely recommend buying the bases from Warlord, as I found that all my lovely paintwork on the hull started to disappear with all the handling you have to do when working on the rigging and sails.


 This is my, currently nameless, Royal Navy brig, preparing for many deadly encounters with the 
Honnête. I think that experience is paying off and this attempt is an improvement on the first. Once I saw how much work was involved in getting these things on the table top, I vowed that I would only ever do two, but now I'm thinking that these long Winter nights would be a good time to continue learning and making more of these lovely little ships. I'm definitely not going to build anything bigger than a frigate!


I can see all those Hornblower and Bolitho novels that I have read over the years paying dividends now as my little ships take to the high seas, without any possibility whatsoever of me getting my feet wet.

I have to say 'hats off' to Warlord; they have put together an excellent package in the Master & Commander Starter Set. There is everything (apart from bases!) that you need to get you started. As I said earlier, it has involved a lot of rummaging around on t'internet to get to a point where I feel comfortablish with what I should be aiming for with my little ships, but I would certainly recommend the Black Seas Facebook Group as a source of helpful information. I think I was on the verge of giving up at the rigging stage, until I came across a photo posted on the group page of a simple one thread method of starting off and that got me motivated to press on and have a go.

The Master & Commander Starter Set can be found here on the Warlord site. £56 is a major investment, but you do get a lot for your money. I've already got the Merchant Vessels set on my Christmas list.