Intro

Intro

Thursday 11 April 2013

The Battle of Arrière du Pont. A Rapid Fire Shoot Out!

My boys and I fought this battle, which involved a combined Anglo-American battle group attempting to secure a vital river crossing from a supported German infantry battalion, during October half term last year. We used Rapid Fire rules with the boys sharing command of the British and the Americans and the Germans were placed under my tender cares!


Two shots of the opposite sides of the battlefield. The Allied right flank wait in the cover of the woods, while the Germans dig in, ready to give their lives in defence of the stone bridge over the river. 

 
This hill on the Allied right flank was a key position, as it overlooked the bridge, giving a clear view of the German defences. The British commander placed a Vickers machine gun and his artillery O.P. team on the hill.


The key position on the opposite flank was the church of Arrière du Pont. The church was occupied by the elite engineers of the 331st Infantry Regiment. The German O.P. team were placed on the roof of the church tower, giving them a commanding view of the battlefield.

 
The hill, as seen from the German position. The British on the hill came under constant fire from the 75mm Infantry Gun, positioned behind the main line of German infantry.
 
  
The German machine gun position in this ruined building in the village completely dominated this side of the battlefield. An entire British rifle company was wiped out by this and the 81mm mortar positioned just behind the building. The British advance proved very hesitant against the village as they preferred to concentrate the fire power of their armour to destroy the German heavy weapons, before they risked their infantry in an assault.

 
British armour advances against the village. The Achilles has been hit by fire from the German Stug III across the river. A company of British riflemen advance under cover of the Achilles and a Sherman Firefly.
 
The British armour advancing, as seen from the ruined building in the village. 
 
 
The Allied left-hook develops as the American company, supported by a Sherman, make a daring assault on the engineers in the church. If the church fell to the Americans, the German position in the village would become untenable. The Allied plan was to take the church and use it as a base from which to roll up the German line. The scene was set for a classic and bloody encounter. 


After a bitter and bloody struggle against the German Engineers, the American company forced their way into the church. Needless to say, no prisoners were taken. This was the critical point in the battle and from this point it was only a matter of time for the boys of the 331st.


The Anglo-American flanking attack on the village cost huge casualties on both sides. The Germans fought to the death, loosing over 200 men in the fight. The Germans, critically, were forced to move men from the bridge area in an attempt to halt this attack, leaving the bridge itself more vulnerable to the coming attack by the main British infantry force.
 
The main British assault storms in towards the bridge. A smoke screen covers their advance and German morale has begun to waiver, thanks to the heavy losses already sustained in the village.
 
 
Two British rifle companies storm across the bridge as German morale finally crumbles. One German company managed to flee the battlefield, but over 600 of their comrades lay dead or wounded.
 
As usual with Rapid Fire, this battle was a brutal and bloody affair. Initially, the Germans held the upper hand as the Americans, in particular, suffered heavy casualties in their advance over largely open ground towards the church end of the village. The attack on the German right flank eventually succeeded because of the support given by the British armour, which enabled the Americans to get into a position to launch their assault on the engineers in the church. Had the engineers been able to hold their position, then the German commander would have had a larger force available to face the British infantry assualt on the bridge and, who knows what might have happened then!


 A British Sherman advances across the battlefield, with a company of riflemen in close support.


A shot of the Allied attack on their left flank, early in the battle. This attack was badly timed and un-supported and lead to inevitable failure. The British riflemen were slaughtered by machine gun and mortar fire from the defenders of the village. Only when the British commander committed his armour to support this attack, were the Americans able to drive home and take the vital church from the German engineers.

Saturday 6 April 2013

Edward of Westminster and the Great Livery Jacket Mystery.


The Prince of Wales calms his retinue while his father dreams of happier times!
 When I first started planning my Lancastrian army to re-fight the momentous events of 1471, the one character I was reluctant to field was the 17 year old son of Henry VI and Margaret of Anjou, variously known as Edward of Lancaster or Edward of Westminster, but, since 1454, the holder of the title Prince of Wales.

Edward was the titular commander of the centre ward of the Lancastrian army that fought at Tewkesbury on the 4th May 1471. The prospect of giving the command of one third of my forces to such a callow youth was not one I particularly cherished, so my original intention was the conveniently forget about him and give the command to someone else, probably the Duke of Exeter, who I was intending to draft in from the Lancastrian army that had fought at Barnet on the 14th April. 

However, when I started to read around things a little bit more, I began to come around to the idea that the young prince really ought to play a significant role in the affairs of my army. Although he was young, Edward had spent his entire life in the midst of the events and intrigues at the very heart of the Wars of the Roses. Following the catastrophic Lancastrian defeat at Towton in 1461, his mother, Margaret of Anjou, had dragged her beloved son around northern England, Scotland and then France, while she planned and plotted to secure his rightful place on the throne of England. Indeed, Edward had spent most of his life as an émigré in some place or other, largely at the Lancastrian court in exile in France, from around 1464 until his mother’s fateful attempt to re-gain his inheritance in 1471.
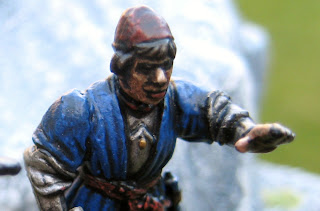
Close up detail of the Prince in action.
 
 I had always thought of Edward as a bit of a feeble mother’s boy, but the experiences of his childhood must have had a massive impact upon his development, and being constantly indoctrinated with his mother’s hatred for the Yorkist faction back at home, would have bred a young man driven to a fanatical desire to oust the enemy and claim his seat upon the throne of England, where his father, grandfather and great-grandfather had all sat before him.
 
 
He would have been brought up listening to stories of Henry IV and his invasion and seizing of the throne in 1399, and this would have inspired him to achieve a similar outcome in the events about to unfold before him 72 years later. We know from reports written by the Milanese ambassador to France in 1467, that Edward was infatuated with the prospect of fighting wars and beheading those that he saw as his enemies. Clearly, Edward was a young man determined to gain, by martial means, that which he viewed as rightfully his and punish, in the most extreme manner, those who had deprived him of it. How could I ever have considered leaving this character out of my plans?
Henry VI, erstwhile King of England, father of the warrior Prince.
One of the best aspects of the ‘Coat of Steel’ rules, is the importance placed upon the characteristics given to the noble commanders of the forces. Obviously, Edward is going to have to have a set of characteristics which accurately reflect both his inexperience as a battlefield commander and his passionate belief in the cause he was undertaking. As the Noble Cards don’t exist for personalities from this part of the Wars of the Roses, I will need to think very carefully about the statistics I give him to reflect this combination of characteristics.

My depiction of Edward shows him enthusing his troops to a frenzy of warlike belligerence(!), before leading them into action against the reviled Yorkists. His father, Henry VI, sits sleeping in a chair, totally oblivious to the events unfolding around him. In reality, this couldn’t have happened in 1471, as Henry was being held captive in London at this time, but this is one of the advantages of wargaming; it allows you to be a bit economical with the truth and change history just a tiny bit to suit your desired situation!
The final figure in the band is Edward’s standard bearer, carrying the heraldic banner depicting the arms of England, differenced with a label of three points. It was painting this particular figure which lead to a change in my painting of livery jackets. For my first few figures wearing livery jackets, I had painted them in quarters, based upon the jacket worn by retainers of Edward IV displayed in the notes included in the Perry Miniatures figures box. When I looked at other Wars of the Roses painted figures, the livery jackets were shown painted in two halves rather than quarters. Following some advice given by Pat McGill of the Lance and Longbow Society in an article in issue 11 of the Hobilar, I am now painting livery jackets in two halves of colour, which also fits in with the way Citadelsix produce their range of livery badge transfers.

So, Edward of Westminster is painted and based and ready to lead his ward into battle. The Duke of Exeter is now supporting the Prince, bringing a little experience and extra blood lust to proceedings. Let slip the dogs of war and may the Prince of Wales smite down his Yorkist adversaries and ascend the throne of England as Edward V!

Monday 1 April 2013

Organising a Wars of the Roses Army for A Coat of Steel.

I have to confess that one of my favourite parts of wargaming is all the stuff that goes on in preparation for putting the troops on the table. I love the research and the organising of the forces, to try and achieve an army which balances playability with historical accuracy. One of the things about Perfect Captain's rule sets, is that they are designed with a very specific historical period in mind, so you don't really need to worry about creating an army which will gain you every possible advantage under the rules, and you don't need to worry about coming up against the dreaded 'rules lawyer', who knows every minute detail of the rule set, but nothing about what happened in real life, you just put something resembling the real thing together and you will have a force which has the potential to win battles... depending, of course, on the skill of the general commanding!

Below are my 'Trees of Battle' for a Wars of the Roses Lancastrian army from 1471.  Originally, I was going to attempt to reproduce the army that fought at Tewkesbury, but that meant leaving out Henry Holland, one of my favourite Lancastrian nobles. I came up with the idea of just choosing any of the nobility who fought for the Lancastrian cause during 1471, but that threw up a further problem; no matter where I searched, I just couldn't find the names of anybody who fought alongside Henry Holland at Barnet. This is not entirely surprising, as the Duke of Exeter has a reputation for being a violent, brainless psychopath, so you probably wouldn't voluntarily nail your colours to his mast. A touch of inspiration solved the problem, when I had the idea of including Exeter in the Ward commanded by the young Prince Edward, son of Henry VI and Margaret of Anjou. Edward was 17 years old in 1471, and it is probable that not many experienced commanders would want to serve under him. Indeed, the most prominent noble to serve alongside the Prince was John, Lord Wenlock, who was only fighting on the Lancastrian side at Tewkwsbury because he was a long term adherent of the Earl of Warwick and, for some unexplained reason, he had failed to turn up for the Battle of Barnet some weeks earlier. So, there you have it, three 'Billy-No-Mates' put together to form a ward in my Lancastrian army.

As you can see, I have tried to have all my contingents commanded by a named person. In 'A Coat of Steel', a contingent can only be made up of either 3 or 4 'bands' and a company between 6 and 16 'bands', so it can be a bit of a struggle to find sufficient notaries to do the commanding! I have planned to include a fairly large number of Shire Levy archer 'bands', partly to increase the proportion of archers to billmen and partly because you only need two figures to a 'band' for Shire Levies, rather than the three for retinue archers!

I plan to give the young Prince Edward some mercenary pikemen for his contingent, because I reckoned that, as he was so young and had spent most of his life in exile, he probably wouldn't have a base from which to draw a retinue of any significance.

Please click on the images below to get a nice clear view of the 'trees of battle' for my planned Lancastrian army of 1471.

Blue/Red Dots = Billmen/Command Figures
Yellow Dots    = Archers
Green Dots      = Pikemen