Tuesday, 14 December 2021

BLACK SEAS - HOW TO LOSE YOUR NO CLAIMS BONUS!

 After a week or so painting, rigging and fitting sails, I have a grand total of TWO of Warlord Games' beautiful little sailing ships ready to play Black Seas. I decided to start small and paint brigs, one each for the Royal Navy and the French Navy. With two brigs completed, it's time to get them on the table and try out the first scenario in the rule book.
My Royal Navy brig is HMS Reliable, commanded by Lieutenant, The Honourable, Archie Browne-Trowsers, younger son of the Earl of Fordwich.
Sworn enemy of Browne-Trowsers is Lieutenant Maurice Mangetout, Master and Commander of the Honnete.

As mentioned above, my very first venture into the Black Seas, was to be the opening scenario in the rule book, Out of the Fog.

The table was set up with the wind blowing a gentle westerly and the random die roll gave the Honnete the weather gauge, sailing from the southern edge of the board.
The first lesson you learn about Black Seas, is that, although the ships seem to be miles away from each other at the start of the game, the distance between them closes so rapidly that, by Turn 2, they are suddenly passing each other at point blank range.

I need to read the rules about "fire as she bears" before my next outing, as Mangetout missed the opportunity to inflict some damage on Reliable as they passed. First shots in the encounter were fired by the Reliable however and Honnete suffered a couple of points of damage.

In the videos I've watched of Black Seas games, the wind never seems to change direction, but on Turn 3, the wind shifted a point, moving round to a south-westerly. This was massively significant, as it gave the weather gauge to the Reliable and she was able to start a manoeuvre round to port to chase down the Honnete, which has begun to make a dash for the table edge and an honourable, if somewhat boring, draw.

On the next turn, Reliable caused more damage to the Honnete and attempted to grapple the French brig. Fortunately for Mangetout, the Royal Navy failed their Skill Test and the grapple failed. However, the Reliable used the rest of its activation to swing round in front of the Honnete, forcing the Frenchman to take a collision test at the start of its next activation!

Yet more failed Skill Tests led to the Honnete smashing uncontrollably into the Reliable and the 8 points of damage, on top of the earlier firing damage inflicted by the British gunners, triggered another French Skill Test... inevitably, the Dice Gods looking unfavourably down on the Honnete, another failure resulted in the Frenchmen Striking the Colours and surrendering to a delighted Browne-Trowsers.

So, the young Lieutenant Archie has taken his first Prize and the First Republic had lost its first ship to the Royal Navy. Surprisingly, I didn't roll any Critical Hits in the game, which was a bit annoying as I'd spent a large part of the previous day making a "Critical Hit Table", to print onto the reverse of the QR Sheet. All in all, I'm looking forward to the next game, even though I found some bits a bit fiddly. I used paper clips to keep track of damage, rather than the tiny card markers in the set and, I found making turns a tad knotty as the ships slid about quite a bit on the shiny surface of the mat.
The festive season is going to need some time committed to more ship building and some further reading into the Additional Rules section of the rule book. For now however, we need to say Adieu to Maurice Mangetout and the crew of the Honnete, as they sail into the frightful captivity of a prison hulk!

Friday, 3 December 2021

Blood Bath on the Char Beck... A Knyghte, Pyke & Sworde Skirmish.

 Following their repulse at Elwick Bridge, Hugh de Puiset and his band of Frenchmen, withdrew and found an alternative route to Durham on the north bank of the Char Beck. Despite the wound he received in the earlier encounter, Hugo Flambard hurried his small band of supporters to attempt to block the French for a second time and, hopefully, drive them back to their ships moored in the port of Hartlepool.

Flambard's deployment was a hurried affair, with his spearmen arriving on the battlefield just in the nick of time...
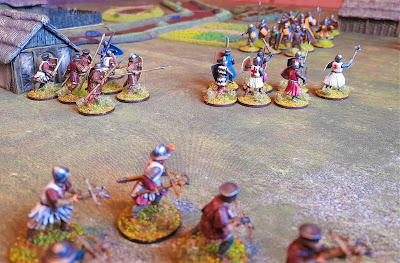
Upon sighting the Flambard forces, the French deployed into a ragged line, crossbowmen on the left, spearmen in the centre and de Puiset, with his Men-at Arms on the right. Flambard's archers arrived on the left of their line, with the two units of spearmen hurriedly advancing in a column on the right.
First card drawn out of the deck was the French spearmen and they move up to join the line.

As Turn 1 continued, Hugh de Morville races ahead and de Puiset leads his Men-at-Arms towards the enemy. The French crossbowmen realise that they have no room to influence the battle and begin to move across to the right flank, where they can face the Flambard archers.
Meanwhile, the Flambard spearmen advance to find room to deploy into a battle line before the Frenchmen can engage while they are still in their marching column.

de Puiset and de Morville dash ahead to catch the Flambard spearmen at a disadvantage.

At this point in the battle, disaster struck for the French invaders... forced to take a Bravery Test after drawing the Bol de Porry card, the crossbowmen panic and unexplainably rout from the battlefield heading off back towards their ships! 

Unaware of events unfolding behind him, Hugh de Morville, the slayer of Thomas Beckett, hurled himself into the fray, and engaged in a deadly duel with the leader of one of the Flambard spear units.

With the narrowest of modified die rolls, de Morville inflicted a nasty wound upon his adversary and forced him back into the midst of his men.

In the centre of the line, the French Men-at-Arms charged into the second of the Flambard spear units and a mortal combat ensued.

Under pressure all along the line, the Flambard spearmen began to take casualties and were forced back by the relentless pressure of the French onslaught.

At this critical point in the battle, de Puiset was wounded by a Flambard arrow and, with the Flambard archers working their way around behind the French line, it looked as though Sir Hugo might just snatch victory from the jaws of defeat. However, the archers next volley proved ineffectual and little now stood between the French Men-at-Arms and the road to Durham.

With his faithful lieutenant, Jerrard Sibton, wounded in the clash with the Men-at-Arms and his spearmen crumbling all around him, Hugo Flambard began to realise that his attempt to block the French advance on Durham looked doomed to failure.

Over on their right flank, things looked no better for the Flambards; de Morville had continued to drive on the French spearmen and, under the relentless pressure, the Flambard spearmen, with only two unwounded men remaining, began to fall back across the field.

After an epic and bloody struggle, the Flambard line collapsed and the few remaining survivors fell back, leaving the field of battle to the victorious Frenchmen. In all, the Flambard's had lost over half their number and, of those remaining, only Hugo and two of his spearmen remained unwounded. Fortunately, the archers had managed to extricate themselves, having expended all their ammunition, to fight another day.


The gallant French Men-at-Arms had finally had the opportunity to display their martial prowess; an opportunity denied them in the confined space at the battle of Elwick Bridge.

Finally, the run of Flambard victories had come to an end and de Puiset was able to join forces with his uncle, the Bishop of Durham. Sir Hugo would need to recruit new forces and plan a new strategy to defeat the combined forces of the de Puiset dynasty.