Sunday, 31 October 2021

500 POINTS OF CLASH OF SPEARS ROMANS

Now that I have enough figures to play an assortment of Knyght, Pyke and Sworde encounters, the focus in the painting shop has switched back to Clash of Spears. I really need to play a lot more Clash, as my previous outings have resulted in all sorts of disasters. Worst of my crimes include missing the fatigue effect of actions and completely forgetting to use the wide array of traits that are assigned to the various troop types. I would have avoided the destruction of my Syracusan Peltasts, when they were attacked by Iberian Scutarii, if I had applied their Skirmish Specialist trait, which allows them a free four inch reaction move... every day is a school day in the world of Clash!

Adding another faction to my collection of Chronicles of Sicily forces, gives me the opportunity to play more games and learn a few more trait effects. You don't get a lot of Romans for 500 points in Clash of Spears, so this winter's painting list includes more Velites and Hastati, some Cretan Archers and some recently e-bay acquired Roman Cavalry.

First up in my Roman order of battle are a group of six Velites...


Figures are Victrix Republican Romans... the Velites are included in both sets of Victrix Legionaries and are beautiful figures to model and paint. They can be built as the earlier Leves, which have no shields, but I prefer this version, with shield, sword and bristling with javelins. My plans for the 900 point warband include at least one more unit of these.

Next come a group of eight Hastati...


I chose 8 figures for the Hastati as they are the backbone of the Roman warband and legionaries are traditionally organised in contubernia of 8 men. I'm not sure if this was the case at this point in the development of the Roman legion, but I like the sturdy feel of 8 of these guys on the battlefield... with heavy shield, partial armour and throwing spear, they cost 20 points a man and they have a host of traits (shield overlap, wall of spears, impulsum and drilled) that you have to master the use of.

Only just completed are a group of six Princeps... 


Being more heavily armoured than the Hastati, costing an extra 5 points per man, I thought 6 of these to a unit would be enough. As things stand, I wont add any more of these when the Romans expand to a 900 point warband although, I'm planning some 500 point games against Carthage and Syracuse so the results of those might just lead to a change of plan.


The current Roman order of battle lacks any ability to hit from a distance, so I've bought some Warlord Cretan Archers to fulfil that role. I also have some Victrix cavalry to paint up, but with Princeps being Milites and Cretans and Roman Cavalry both being Rare, fielding them all would result in an Ad Hoc Warband rather than a Muster Warband, which is what I would rather have!


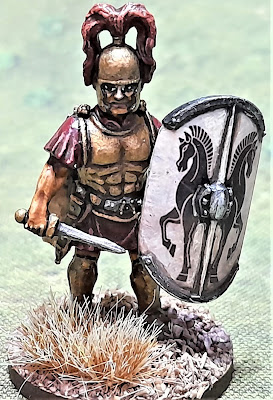
Either way, this is the man who will have to command them all. At 900 points, I will need to add a second leader to have enough Command Points to go around. So, this chap will be a Level 4 Leader and a, yet to be painted, second in command will be either a Level 2 or 3.


Tuesday, 12 October 2021

They Shall Not Pass... a Grim Encounter at Elwick Bridge.

 The Bishop of Durham's Nephew Arrives in Hartlepool.

Part of the Bishop of Durham's plan to increase his influence in the region while King Henry was occupied putting down the "Great Revolt", was to seek assistance from his nephew, another Hugh de Puiset, the Comte du Bar sur Seine. Nephew Hugh duly arrived at the port of Hartlepool, accompanied by a small retinue of Men-at-Arms, Crossbowmen and Spearmen and was met by Hugh de Morville, who was to escort the Comte to the Bishop's residence in Durham.

Hugo Flambard received word of the arrival of the French and planned to intercept them on their journey westward as they crossed the bridge over the Char Beck near the small village of Elwick. As the French approached the bridge, the Royalists had only a group of archers and some local levy in place, with Flambard and the rest of his force still en route to the scene. Hugh de Puiset sent de Morville ahead, with a unit of Bishop Hugh's spearmen, to seize the bridge. These were the only units on the table at the start of the battle.

In this game of Knyght, Pyke & Sworde, I used a card deck activation system. Both sides had two cards in the deck at the start of the game. At the end of each turn, two dice were rolled and any odd numbers added a Royalist card to the deck, while even numbers added a de Puiset card.
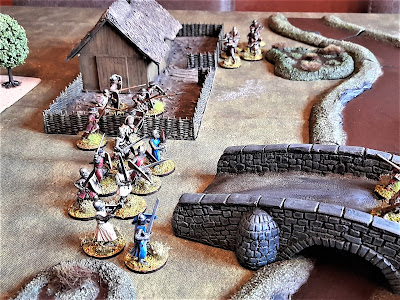
In the distance, de Morville and a group of the Bishop of Durham's spearmen approach the Elwick Bridge. The local levy are formed up to defend the bridge and a group of archers rush to support them.
The tension mounts and the levy (classed as Rabble in the game!) shuffle forward to block the approaching enemy. The card activation system definitely favoured the Royalists as all their available groups deployed quickly onto the tabletop, while the French had to wait until late in the game before their main force arrived.
Hugh de Morville sends his Spearmen into the attack. The late arrival of the French leaves the Spearmen isolated and a desperate struggle ensues, with the levy fighting well beyond what could be expected. (They had unbelievably lucky dice rolls!) The fierce resistance put up by the levy enables the Royalist Spearmen to form up in a defensive line, making it virtually impossible for de Puiset to force the bridge.
Casualties begin to mount amongst the Bishop's Spearmen. In the distance, Royalist archers set up firing line along the river bank.
Time and time again, the spearmen push forward, but the levy, now encouraged by Jerrard Sibton, refuse to yield. The Royalist archers fire a volley into the spearmen but their arrows clatter ineffectually off the stonework.
Belatedly, the main French force arrives and de Puiset sends his Men-at-Arms into the carnage on the bridge.
In the confined and confused melee on the bridge, the Men-at-Arms are unable to influence the outcome of the battle. 
Just as the levy begin to tire and give ground, the veteran sergeant, Jerrard Sibton hurls himself into the fray on the bridge and forces the spearmen back onto the swords of the advancing Men-at-Arms. The French attack grinds to a confused halt. 
Sibton continues to drive his way across the bridge, slashing and hacking like a man possessed.
Meanwhile, the French crossbowmen arrive on the far bank of the river and launch a volley of deadly bolts, one of which strikes the Royalist captain, Hugo Flambard, causing a terrible wound.
When the last of the brave levy withdraw from the fight, the wounded Flambard launches one of his units of spearmen onto the bridge and the Royalists begin to gain the upper hand. On the far side of the bridge, de Puiset realises that the day is lost and calls his Men-at-Arms back to fight another day.

With their Captain wounded, the Royalists form up and launch a tirade of abuse at the retreating Frenchmen. All of the Bishop's spearmen were either killed or wounded in the action, but the French themselves suffered very little. They will need to find an alternative route to Durham from here and they have learned that their enemy are a force to be reckoned with. Hugo Flambard will have his wounds tended and will return to continue to lead the fight against the tyranny of the Bishop and his French allies. 

Monday, 11 October 2021

A Most Pious but Impoverished Knight…


Hugo Flambard was born around the year 1140, the son of Thurstin who was the illegitimate offspring of Ranulf Flambard, Bishop of Durham and his mistress, Aelfgifu. Hugo’s grandfather was a senior advisor to King William Rufus and held numerous ecclesiastical offices. Most notoriously, Ranulf was responsible for collecting the King's taxes, which he did with legendary efficiency, making him highly unpopular with the vast majority of the population. Ranulf was arrested when Rufus’ brother Henry became king, but subsequently wrote himself into the history books by becoming the first person to escape from the White Tower of the Tower of London. His grandson, Hugo, clearly inherited his grandfather’s courageous and enterprising genes and was able to rise from total obscurity to a position of minor command in King Henry’s army in Wales in the 1160s. When Henry’s forces suffered a major reverse on the Berwyn Mountains, Hugo’s bravery fighting in the rear guard, as the army retreated back over the border, brought him to the attention of the King himself, who rewarded him handsomely for his efforts. In the later stages of the retreat, Hugo was wounded in a Welsh ambush, only being saved by the intervention of the man who had become his great friend during the campaign, Jerrard Sibton. Hugo’s wounds forced him to leave the King’s service and he and Jerrard returned to the north to settle on a small estate inherited, with dubious legality, from his grandfather.

When the Great Rebellion against King Henry began and the current Bishop of Durham, Hugh de Puiset, clandestinely sided with the rebels in order to further feather his own nest, Hugo called upon friends, retainers and the local population to join him in a “Crusade” against the ungodly depredations of the Bishop. With little in the way of resources, Hugo’s struggle was a “David versus Goliath” affair, as he not only had to stand up to the Bishop with his vast wealth, but also, potentially, would have to face the army of King William the Lion and his wild array of marauding Scots. Unbeknown to Hugo, at the outset of the rebellion, the Bishop had called upon his nephew, the Comte du Bar-sur-Seine, for military assistance and so, Hugo and his band of retinue men and local levy would have to stand up to an array of veteran French soldiers as well the Bishop’s loyal retinue.

Having been born on the wrong side of the blanket, Hugo was unable to bear the arms of the Flambard family, so he chose instead to wear the Cross Bottony as his emblem; the three lobes on the arms of the cross, signifying truth, justice and undying loyalty to the king.


Born of a Viper's Brood...

Hugh de Morville was born around the year 1138, the son of Hugh de Morville, the hereditary Constable of Scotland, who held the barony of Burgh-by-Sands in Cumberland and Ada, daughter of William de Engaine. Hugh’s mother was a “licentious and treacherous” woman and many believed that she was the root cause of her son’s imprudent and flawed character.
Around the year 1158, Hugh became a member of King Henry’s Court and married Helwis de Stuteville, through whom, he acquired Knaresborough Castle. For a time, while Thomas Beckett was Chancellor, Hugh became one of Beckett’s men, but always remained loyal to King Henry. So it was, when Henry and Beckett, by that time Archbishop of Canterbury, fell out, over the right of clergy to be tried by the Church, that Hugh, along with three other knights of the King’s Household, travelled to Canterbury and murdered Beckett. The murderers subsequently fled north to Scotland and later took refuge in Hugh’s castle at Knaresborough. All four murderers were excommunicated by Pope Alexander III, but they agreed to make penance for their deeds by taking service in the Holy Land. Before they could leave to serve with the Knights Templer, the Great Rebellion against King Henry broke out and Hugh immediately rode north to Durham to offer his sword in service to the Bishop, whom he believed to be defending the North, in the name of the king, against King William the Lion and his raiding Scots. When Hugo Flambard took up arms against the Bishop, Hugh regarded this as an act of treason against King Henry and swore before the shrine of Saint Cuthbert to put the rebel to the sword. Only time would tell if de Morville would see through the Bishop’s schemes and realise that his sworn enemy was actually his ally.